Twice per year, I move this Post forward. If not, as you can expect, things get lost in history..
So now 6 months have passed and you get an update! How Cool! :)
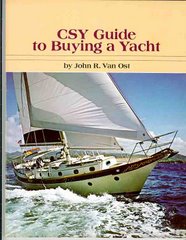
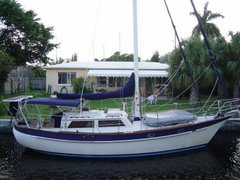
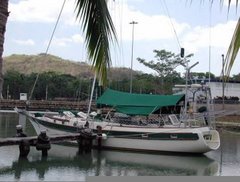
.........If you own a CSY built from, you are offered a place to post pictures and write ups about your boat, "right here."
It's a great way for all of us to get to know each other and spend some time, similar in a way to being in a harbor and get to meet up for an evening or two. Here tho, we can reread and view, what we can not remember the morning after :)
Send a photo of your boat, yourselves or a couple of your "Happy Projects" and let's see what we have.
Nearly 3 years now and all is running well/Quality!
My hopes are to place ANY CSY BOATS CURRENTLY OUT THERE WITH OWNERS CONNECTED TO THE INTERNET and interested.... a place to show their vessel and it's condition, problems, improvements or ? This is available now, right here. So, what are you waiting for?
Ready to show off your vessel?
Here is your opportunity. Just Email your initial write-up and photo attachments to: s.v.memoryrose@gmail.com
With just a few emails, you can have your boat up on the web, showing off your proudest projects.
Stay well and keep smiling,
ron sheridan
Friday, January 06, 2012


Wednesday, December 28, 2011
Chain Plates/for CSY and Other Great Cruising Boats worth Upgrading, Including Chain Plate Fabrication thoughts. part 1
It would be wonderful if everything lasted forever but when dealing with boats, I think it is fair to say, "that is not true".
If any of us went out and bought a 1977-1981 Buick or Cadillac, we wouldn't think of taking it out on the road and pushing it to 80 or 100 mph with the original old tires on it, would we? Stainless steel, used for components such as rigging wire, chain plates, and most bolts aboard, is somewhat like rubber, in that it can and does degrade; rubber via sunlight, stainless steel via water/deoxygenated water. It doesn't mater if your eyes spot the fine cracks, the wetted material degenerates.
Rust on an interior chain plate, is a sign of water intrusion through or around the cap rail. It's difficult to determine the extent of damage by the rusting discoloration of the surface. It is known that water has seeped into the hulls around these plates on most boats. If the discoloration is there, that is the proof. After 30 years, it seems advisable to remove and replace them, just as one would do with old tires. The CSY is lucky to have reasonable accessability to the plates, so this project makes the CSY's lifespan extendable more than many or most boats out there.
Rigging wires have a life of about 10 years or a circumnavigation due to the same processes of wetting and stress loading. Why would it be reasonable to think other stainless steel under similar loads or conditions would be different? (I don't know about yours, but my boat will be 31 next month.)
I only became suspect of stainless in the
  mid 90's and somewhat must thank the CSY Topica list for allowing the subject to get specific, linking the problem to chain plates. Years have passed and much has occurred to confirm that 'we' the owners of this quality sailboat, need to be aware of all the components that contribute to the safety of those who travel on or in it. As I have just mentioned, we would not think of driving a car on old cracked tires, so why would we consider our boats impervious to degradation of important parts. (rigging wires 10 years-chain plates and their bolts... 30???) This is NOT a CSY problem. It IS a boat problem...All boats. http://www.amarinesurveyor.com/chainplate.htm We are lucky though that as a group, we have discussed it and doing something about it. Many vessels do not have the advantage of our history of discussion/repair solutions, so we are ahead of the pack and safer for it. For some boat brands, this might not be a doable project so they ignore it. Those boats will soon be worthless.
Do not loose the concept that surveyors will not always pick up even, 'visable' problems. They sometimes(and I think I am being kind)seem to not speak of problems that will 'kill the deal'. They are limited to 'viewing' and cannot disassemble anything in their survey, so not uncovering all defects is the reasonable outcome. Even if you ask specific questions and 'get it in writing...' you should trust that Father Time has done his thing and CYA in budgeting for repairs and replacements.
I "Chose" to remove my chainplates before there was a problem. My personal solution was to me, a CSY 44 UPGRADE. After seeing a great chain plate design in Steve Dashew's Cruising Encyclopedia, page 582, I modified their concept a bit to adapt it to the 44' CSY hull and had 10 of them made. Cutters need 6, ketches need 10. (I now use 12 to enable me to rig the m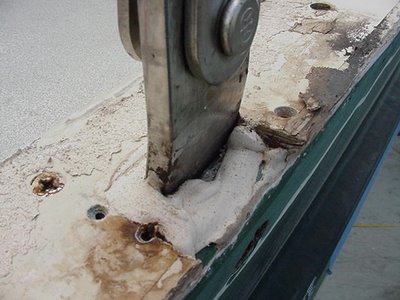 izzen independently from the main without using a triadic stay- by adding forward intermediate stays from the mizzen instead). So far, 6-12 sets of circular plates have been made and installed on CSY 44's. Wide grip, easy fabrication(identical plates) and simple installation and external for many reasons.
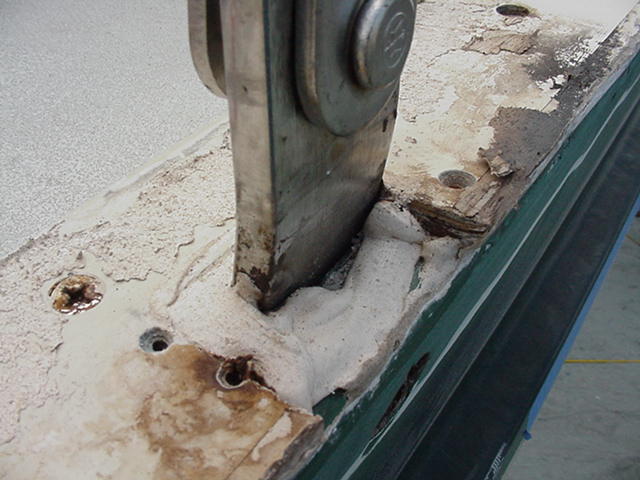
Bedding (original) around INTERNAL chain plate was poor. Gap shown here, of 1/4" x 1.5", allowed water to seap below decks. Rust stains on 52oo shows poor bonding and a place that water stagnated.
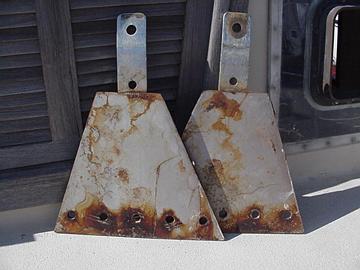
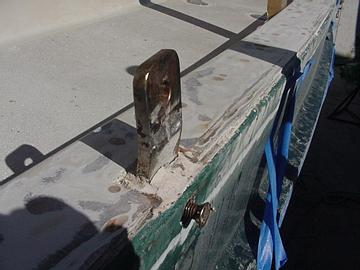
Photos included here are of the original CSY Triangular plates and are offered only to explain and show the 'obvious' problems. Stainless steel does not last forever and certainly does not 'IF' it is subjected to an Oxygen deprived environment, as "in a trapped area" below the teak cap rail. The bedding of the cap rail was done in such a way as to allow water to get below the cap rail and then run down hill to any opening into the hull, sometimes allowing water to drain to lockers or chain plates.
CSY chose to use 'Internal' chain plates. The chain plate then needs to have it's tang pass through the hull at deck level to attach to the rigging turnbuckles. It is at this point that caulking of some kind is needed and so doing, creates an area to entrap water. Even if only a drop or two, it will stagnate and become oxygen starved, eventually leading to crevise corrosion and stainless steel failure.

The main failure point seems to me to be the first hole below c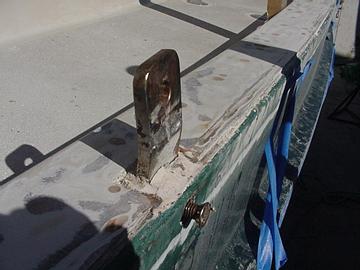 ap rail level and also the cap shroud the most common failure plate.
Failures seem to occur at or near this upper bolt hole as it is the weakest point, due to limits of material mass or weld, subjected to water degradation; then, stress from the rig. The 2" tang, is drilled for the 1/2" top mounting bolt; leaving (2) 3/4" segments of 3/8" stainless, just under the cap rail to get wet and develop 'crevice corrosion'. Add 30 years to the damp environment and rigging stresses and you get.........?
This 2" (now 1.5")drilled tang, is the weakest point of the chain plate. It's subject to crevice corrosion/and stress/it's bolt can be loosened by rigging pressure pulling it's top bolt's flat head inward thru the glass(poor fiberglass support). CSY's design of spreading the chain plate load over 5 lower bolts and only one for the top was going in the right direction in my opinion by spreading the grip over a wide area of glass, but the top bolt is being pulled inward esp. on the forward and aft lowers, which makes it subject to loosening it's grip on the hull and also allowing the upper seal to leak due to movement. That movement will eventually allow water to creep below. An external chain plate would not have had this problem and I opted for this as a fix for my boat.
The load on the "Tang" for the forward and aft lowers, is inward towards mast. The original flat head bolt up near the cap rail and under the 2" teak strip below the cap rail, gets pulled into hull at forward and aft lowers. This load can potentially allow enough movement to break a seal as the tang of the chain plate goes through to the rigs turnbuckle.
Some drawings and photos will be offered on alternative ideas demonstated by owners to aleviate the potential problem and make the chain plates 'Inspectable'.
Do NOT feel that the problem is a "CSY ONLY" problem. Aging stainless steel is a problem that ALL boats share. However, many CSY owners have addressed the issue and have solutions! Chain Plates: part 2 will cover some of them. Even after 30 years, a few projects will bring a rebuildable boat up to snuff.
For your interest: A few months ago I received an email from the editor of PACIFIC YACHTING/boating in the PACIFIC NORTHWEST, regarding my photos of CSY stainless chain plates and bolts . They did a decent write up on th
 e faults of Stainless Steel in the marine environ
 ment and used a few of my photos. The bottom line is not my photos, but that good magazines are addressing problems that "All boats of our vintage need to address. Deterioration of metals is a subject for required reading on ALL boats. "WE" are ahead of the others in discussion of solutions!
If any of us went out and bought a 1977-1981 Buick or Cadillac, we wouldn't think of taking it out on the road and pushing it to 80 or 100 mph with the original old tires on it, would we? Stainless steel, used for components such as rigging wire, chain plates, and most bolts aboard, is somewhat like rubber, in that it can and does degrade; rubber via sunlight, stainless steel via water/deoxygenated water. It doesn't mater if your eyes spot the fine cracks, the wetted material degenerates.
Rust on an interior chain plate, is a sign of water intrusion through or around the cap rail. It's difficult to determine the extent of damage by the rusting discoloration of the surface. It is known that water has seeped into the hulls around these plates on most boats. If the discoloration is there, that is the proof. After 30 years, it seems advisable to remove and replace them, just as one would do with old tires. The CSY is lucky to have reasonable accessability to the plates, so this project makes the CSY's lifespan extendable more than many or most boats out there.
Rigging wires have a life of about 10 years or a circumnavigation due to the same processes of wetting and stress loading. Why would it be reasonable to think other stainless steel under similar loads or conditions would be different? (I don't know about yours, but my boat will be 31 next month.)
I only became suspect
 of stainless in the
  mid 90's and somewhat must thank the CSY Topica list for allowing the subject to get specific, linking the problem to chain plates. Years have passed and much has occurred to confirm that 'we' the owners of this quality sailboat, need to be aware of all the components that contribute to the safety of those who travel on or in it. As I have just mentioned, we would not think of driving a car on old cracked tires, so why would we consider our boats impervious to degradation of important parts. (rigging wires 10 years-chain plates and their bolts... 30???) This is NOT a CSY problem. It IS a boat problem...All boats. http://www.amarinesurveyor.com/chainplate.htm We are lucky though that as a group, we have discussed it and doing something about it. Many vessels do not have the advantage of our history of discussion/repair solutions, so we are ahead of the pack and safer for it. For some boat brands, this might not be a doable project so they ignore it. Those boats will soon be worthless.
Do not loose the concept that surveyors will not always pick up even, 'visable' problems. They sometimes(and I think I am being kind)seem to not speak of problems that will 'kill the deal'. They are limited to 'viewing' and cannot disassemble anything in their survey, so not uncovering all defects is the reasonable outcome. Even if you ask specific questions and 'get it in writing...' you should trust that Father Time has done his thing and CYA in budgeting for repairs and replacements.
I "Chose" to remove my chainplates before there was a problem. My personal solution was to me, a CSY 44 UPGRADE. After seeing a great chain plate design in Steve Dashew's Cruising Encyclopedia, page 582, I modified their concept a bit to adapt it to the 44' CSY hull and had 10 of them made. Cutters need 6, ketches need 10. (I now use 12 to enable me to rig the m
 izzen independently from the main without using a triadic stay- by adding forward intermediate stays from the mizzen instead). So far, 6-12 sets of circular plates have been made and installed on CSY 44's. Wide grip, easy fabrication(identical plates) and simple installation and external for many reasons.
Bedding (original) around INTERNAL chain plate was poor. Gap shown here, of 1/4" x 1.5", allowed water to seap below decks. Rust stains on 52oo shows poor bonding and a place that water stagnated.
Photos included here are of the original CSY Triangular plates and are offered only to explain and show the 'obvious' problems. Stainless steel does not last forever and certainly does not 'IF' it is subjected to an Oxygen deprived environment, as "in a trapped area" below the teak cap rail. The bedding of the cap rail was done in such a way as to allow water to get below the cap rail and then run down hill to any opening into the hull, sometimes allowing water to drain to lockers or chain plates.
CSY chose to use 'Internal' chain plates. The chain plate then needs to have it's tang pass through the hull at deck level to attach to the rigging turnbuckles. It is at this point that caulking of some kind is needed and so doing, creates an area to entrap water. Even if only a drop or two, it will stagnate and become oxygen starved, eventually leading to crevise corrosion and stainless steel failure.

The main failure point seems to me to be the first hole below c
 ap rail level and also the cap shroud the most common failure plate.
Failures seem to occur at or near this upper bolt hole as it is the weakest point, due to limits of material mass or weld, subjected to water degradation; then, stress from the rig. The 2" tang, is drilled for the 1/2" top mounting bolt; leaving (2) 3/4" segments of 3/8" stainless, just under the cap rail to get wet and develop 'crevice corrosion'. Add 30 years to the damp environment and rigging stresses and you get.........?
This 2" (now 1.5")drilled tang, is the weakest point of the chain plate. It's subject to crevice corrosion/and stress/it's bolt can be loosened by rigging pressure pulling it's top bolt's flat head inward thru the glass(poor fiberglass support). CSY's design of spreading the chain plate load over 5 lower bolts and only one for the top was going in the right direction in my opinion by spreading the grip over a wide area of glass, but the top bolt is being pulled inward esp. on the forward and aft lowers, which makes it subject to loosening it's grip on the hull and also allowing the upper seal to leak due to movement. That movement will eventually allow water to creep below. An external chain plate would not have had this problem and I opted for this as a fix for my boat.
The load on the "Tang" for the forward and aft lowers, is inward towards mast. The original flat head bolt up near the cap rail and under the 2" teak strip below the cap rail, gets pulled into hull at forward and aft lowers. This load can potentially allow enough movement to break a seal as the tang of the chain plate goes through to the rigs turnbuckle.
Some drawings and photos will be offered on alternative ideas demonstated by owners to aleviate the potential problem and make the chain plates 'Inspectable'.
Do NOT feel that the problem is a "CSY ONLY" problem. Aging stainless steel is a problem that ALL boats share. However, many CSY owners have addressed the issue and have solutions! Chain Plates: part 2 will cover some of them. Even after 30 years, a few projects will bring a rebuildable boat up to snuff.
For your interest: A few months ago I received an email from the editor of PACIFIC YACHTING/boating in the PACIFIC NORTHWEST, regarding my photos of CSY stainless chain plates and bolts . They did a decent write
 up on th
 e faults of Stainless Steel in the marine environ
 ment and used a few of my photos. The bottom line is not my photos, but that good magazines are addressing problems that "All boats of our vintage need to address. Deterioration of metals is a subject for required reading on ALL boats. "WE" are ahead of the others in discussion of solutions!
Saturday, December 10, 2011
Chain Plates/ CSY and for other Great Cruising boats worth upgrading: part 2

First to consider if changing out Chain Plates is whether to just replace the originals with the exact same design, or to rethink the pros and cons to see if there might be something better.
A CSY modification like this has been done by a number of owners; externally mounted, not internal, 1/2" plate not 3/8", wide 4" tang not 2", 316 polished/highly corrosive resistant stainless steel/more bolts(8 not 6)/countersunk to eliminate moisture trapping or line snagging, wider footprint gripping the hull, moreso than original 5 bolt base/not less.
Some have replaced the original "Internal" plates and tried to keep them bedded properly. One, has tried to use a superior stainless steel (duplex) and make a one piece replacement rather than a weldment, yet stay with internal mounting. The replacement of chain plates brings up the question of pro's and con's of either Internal or External plates. Internal plates can be removed and a shop can make up 'exact' replacements(each plate tho, will have different angles) plus all the original problems of potential leaks and crevice corrosion/inaccessible inspection through deck/cap rail material. External plates are one piece cutouts and therefore identical to each other; only afterwards are the plates tangs bent inward at the appropriate fore or aft angle needed to align with the stay or shroud. Internal plates have been a weldment but an exit slot might need to be modified if New Plates are cut from one piece of stainless steel or thicker. External need to be better looking, so polishing manually or electro-polishing is the norm
 , and both measures highly reduces degradation or even discoloration later.
10" circular plate with "Double Tang", mounted above original rub rail/shown on pilothouse ketch. (a tang wide enough for 2 attachment holes, allow adding a shackle for an extra attachment point (when needed) + extra beef in the tang area ) click on photo for better view
Do not forget, that a 33' CSY and a 44' have different size plates, so the amount of S.S. might be double on the bigger boat. Also if you go From a thinner plate to a thicker plate....again you are using more Stainless Steel and it's sold by the pound. IF you are going to mount your plate where you can see it...you probably want it to shine. That will cost some in time or dollars for the labor required. Manual polishing is beautiful and worthy of time and effort, but so is Electro Polishing, as it also protects the surface from rusting. Manual polishing and electro polishing combined, is even better! A no brainer!

It should be noted that Peter Stolken, ex floor manager of the CSY plant, later on-added external chain plates-to his own prototype CSY pilothouse. His vertical straps are common for external chain plates on wooden boats and
 the look agrees with traditional aesthetics drawn by Peter Schmitt for the CSY.
On wooden boats, vertical straps are tied into the vessels planks. Fiberglass boats can use the older aesthetic or build plates tied into the hull horizontally (as CSY plates do to use the support structure of the hull's glasswork.)
Peter's "Independence"(above), a custom/one off pilothouse has retrofitted external vertical chain plates. Photo by David Kummerel. click to enlarge any photo

A 4" tang on another design offers strength plus original 6 bolts. Machine work by JTR/Gulfport, Fl.
After learning of possible chain plate problems in the late 90's, I started to research how other boats were handling the design issue. Steve Dashew's circular design for his Deerfoot Yacht chain plates looked good to me. (It's on page 582 of his Cruising Encyclopedia.) CSY had used a 1/4" triangular base with 5 bolts and one above, welded to a vertical 3/8" piece of flat bar which became the tang above deck. I took Dashew's circle idea, to make a 10"diameter with 4" tang, cut out of one piece of 1/2" thick, 316L stainless steel, mounted externally. One piece/no welds or it's possible crevice corrosion/ thicker material/ highly polished for less corrosion/more bolts-8 vs.6/ countersunk for less chance of crevice corrosion of the attachment bolts, yet inspectable and accessible. The 10"diameter will clear all 44' CSY's. In every aspect, more rather than less than original.

Above:
External 10" plate mounted before new external high rub rail was added. The teak cap rail is removed here BUT, that is not a part of this chain plate job!
A small amount of the original teak cap rail can and should get cut away, to allow the external plate tang to lie flush against the fiberglass of the hull.


S.V.BEAUJOLAIS replaced chain plates in Panama. Rick Heim of Gulfport Machine, St. Pete, Fl. made and shipped them. Work was done dockside, with Roger and a local worker taking on the task. Looks good huh? Roger admits a little extra time later on will be needed to make things bristol again, but I think they did a fine job.
I designed these circular plates for 'my' boat, but offer photos and text for others to investigate. As you can see, the plate fits 'properly'.
-CSY original chain plates were internally mounted and their tangs penetrated the cap rail. This left the tang encapsulated through fiberglass and teak for about 2" and could not be checked for crevice corrosion down in that area.

Drawing of plate (above).. note upper 2 holes were slightly lowered so that nuts and washers could be easily installed-inside the hull- and below interior of cap rail. Center bolt lowered only for aethetics of design/it Looks better than centered!
External plates, instead of the internal ones, can be inspected visually and if caulking is necessary; it is easy to accomplish. -CSY interior plate used 6 bolts-the circular external 10"design uses 8 (and countersunk bolts that are easy to bed/seal; note: I do not recommend External Hex Head bolts which catch a lazy sheet an
 d are more likely to suffer from crevice corrosion under their heads as they are near impossible to keep caulked/sealed perfectly.
NOTE: The Single 2" Tang design was scrapped by me.The Advantage of wide double hole tang was too overpowering to dismiss, so all plates were made with 4" tang.
(Click on any photo to enlarge it).
Use of flat Socket Head bolts (special order)sit flush with the outer plate and offer a strong grip for tool installing or removing that Slot or Phillip heads do not. CSY, the flat head end of the chain plate bolt was embedded in the rub rail and not accessible. -Going to "external plates", gives you the option of easily changing out bolts if you are concerned as they are not embedded but installing 316 grade bolts in the first place solves future problems. -CSY plates were welded, this design is not.
/
 S.V. Soggypaws/WT 44, with 10" plates and wide 4" tangs, installed in 2005. Dave chose to remove the teak cap rail, adding instead an aluminum slotted toe rail forward.
Plate project took Dave and Stacey / husband wife team, about a week.
Mounting externally, helps reduce the possibility of oxygen deprivation and therefore should fair better in the elements. Also, they are easy to inspect.
A slightly different twist on the circular design was used by Pete a few years ago, out on the west coast on his boat Imagine. check out this link to his efforts, including his comments on cutting stainless steel using water jet technology and it's very reasonable cost.
www.imaginecruising.com/web/the_boat/repairs_and_reinforcements.htm
As said before, if you were buying a late 70's car of any 'make', you would do a number of things to make sure it is up to specs for a good safe ride. No mater what boat you chose, do the same. Be safe, stay well and keep smiling, it does not add anything significant to the cost of the vessel and really helps to bring back the strength and safety factor.
Wednesday, November 02, 2011
Drive Trains and Overall Performance
Every year or so, a question regarding engines, transmissions, propellers, cruising speed etc. sparks conversation and sometimes debate. It would take a very rare bird, to say that what they have, or what they have done, is 'not' what they now think is best, but in all conversation it does pay to listen or read carefully, so keep that in mind. I try to be fair, and keep to facts, but opinions mine and others will at times, disagree. Reading comments of others on Topica more than once and with care, sometimes catching the posts tagging along under the response, that have been sent outside of the mainstream Topica discussion, always proves interesting.
Points I noted this round of discussion:
1-Most folks would like to be able to cruise at or near hull speed.
2-Speed is not a constant and is subject to weather and wave conditions.
3-Fuel consumption varies with engine size and amount of effort demanded from it.
4-Some engines parts are getting hard to find for some engines but some are still serviced worldwide.
5-Yamaha's inboard is becoming a common choice.
6-Naturally Aspirated engines vs. Turbo choices will be debated for a long time to come.
7-Drive train and performance includes engine, transmission ratios, propeller diameter as well as pitch.
8-Changing engines is more than likely financially more costly and labor intensive, than rebuilding one or a direct replacement.
9-Dig deeper into all comments made.
1. To be able to cruise at hull speed, the engine needs to be able to run continuously at less than max and allow the boat to do 1.26 X the Square Root of the waterline length. (1.26 used here is for fat boats like ours.........a newer streamlined underbody would use 1.35 or there abouts)
This gives the 44 a theoretical hull speed of about 7.5 knots. Note that when motoring up to 5 or 6, the wake is minimal but when trying 7 or 8 the wake drastically increases. The force required to move the boat through the water (and move the water up into the atmosphere causing a wake) is increasing radically the faster you go. The boat is trying to plane, bow up, stern down. The ideal is to be able to get close to this 7.5 for a 44 in moderate conditions. Doing 6 or 6.5 is easily doable and a whole lot less expensive.
2. Flat calm reduces resistance to the hull and allows it to gain speed slowly over time to reach cruising speed. Throw in some 1 or 2' waves will slow down any drive train combination, but these small waves, or larger, will have less effect on larger engines and larger diameter props.
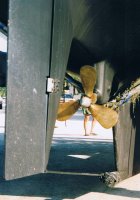
CSY didn't put a 24" prop on their boats because they liked to waste money. Larger diameter props, are a design element of displacement boats; bigger diameter/smaller pitch. If you want to go fast with a planing hull, it is the opposite; reduced diameter and increased pitch. To give a radical example, consider instead of your diesel engine, the manufacturer placed a 75 HP Outboard Engine on your boat(OK, even with an extended shaft). You could make the engine scream, but the small prop would give poor boat acceleration and have little effect against headwinds or waves. Point made?
Props are also designed with overall surface area integral to its intended use. Sailboat props are normally contain a surface of less than 50% of the overall area of the circle. Powerboat props usually go about 70%. That means, when looking at your prop from astern, the sail prop covers half of the available area that water has to pass or grab, and power props grab 70% of it and also restricts water passage by 70% when sailing. Props with 5 or more blades are used for grabbing even more water and are common on tugs, w
 orkboats, ships, subs and can use 100% or more of the circle by using overlapping flukes.
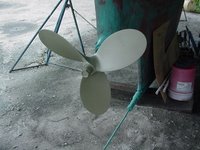
Original 24"Prop of CSY
Since sailboats 'sometimes' really like to sail, 50 % surface area or less is the rule. I have seen smaller 3 blade power boat props
on an Antigua and the owner said it was fine. I've heard 20" for CSY's and believe their owners are happy. I have heard owners of max props, Martecs and auto props all tell of the great performance. Never, have I heard a complaint, about a change from CSY's 24", 50% sail prop design element, but the differences are very noticable. Martecs and Maxprops "flat blade" design can at best give you about 85% of the efficiency of a standard prop because the standard prop flukes are designed to create lift. You will never get the same speed 'motoring' with a feathering or folding prop, at the same rpms as you will with a properly pitched fixed prop. As one owner did, increasing his pitch from CSY 15" to 17", helps because that is a 13% boost in pitch. In calm water you can expect a boost from near 6kts. to near 7kts. With
  75 HP, you can repitch to 18". In choppy water you will still need diameter. Ten years ago, I installed a 24" Martec, 3 bladed feathering prop. It was great for sailing, but I lost a knot under power even though I tweaked it's external pitch adjustments.
Martec, 3 blade, feathering, 24" diameter propeller at left
3a. Fuel consumption. Much ado about nothing! I never heard of a Ferrari owner complaining about gas mileage, did you? Many owners have more into their boats than it would take to snap up a used Farrari, so come on. I put a grand a year into my boats tank (maybe) and alot more into my car. If an element like 1.5 gallons/hour or 2, or nail it to the wall for a few hours and burn 3, is really going to effect our cruising speed over time, then I'm talking to the wrong group!
3b. Engine life. I've had my boat 15 years and have put less than 2000 hours on. (True, I work on it too much and sail too little, but) I have traveled from the Chesapeake to Mobile along the coast. Around Florida a couple of times. Across the Gulf of Mexico to Pensacola a handful of times, up the Tombigbee waterway from Mobile, Alabama up to Kentucky, then all the way through the Cumberland River and Tennessee River, then back to do the Florida Keys a couple of times and yes some local daysailing. Fifteen years, less than 2000 hours. My old Lehman will last 15-50K hours without a rebuild, so I guess I'm good for another century if I keep spares:)
4. Parts. IF you wish to keep your engine, spend some time and you will locate a part, or rarely you can have something else made or adapted. If the engine is an antiquated design, using an engine that CSY used and built their stringers for, might simplify your hunt and reduce your cost. Ed Marill exchanged his engine for a totally rebuilt Perkins 4-236, 75 hp. for about $7000. if I remember correctly. No major projects like stringers to cut, extensive glass work, and adaptation of systems, transmissions or props. I've done them all. Ed did repitch his 24" CSY prop to 18" and was able to lower his rpms and gain hull speed while cruising. [ A 3" increase in pitch is a 20% increase. In theory, 20% more forward movement in the same period of time or RPM's. 6+ knots is now 7.5.] Later, he added a 23" Auto Prop and was very satisfied with it as well. Like probably most owners, Ed chose not to do the majority of work himself but to hire a pro for engine install. I'm guessing he laid out somewhere above $10,000 to complete the engine replacement/upgrade. I'm also guessing that total cost for an installation would run $20,000 for engine/material/labor on an engine install of a different configuration. Some of us are capable of doing our own work and finding good shops or outlets for parts, to keep costs down, but it is still a major task.
5. Yamaha. My 2 cents. Remember Evenrude, Johnson, Murcury? Sure they are still around but their marketing is not up the the imports. Maybe even their product is more similar to Chevy or Ford and thus are loosing the import battle, but certainly are not the Scott-Atwaters or Lawsons or Elgins of yester-year. Marketing is more decisive in how we now live than engineering. Sad.
Thirty some odd years ago, I was a marketing major so when I got an eye opener in St. Lucia, it all made too much sense.
We had been on charter and when leaving I asked the driver to detour if necessary to find a place to leave our extra food and supplies. I did not want them to be left for the Moorings community.
He drove to a small fishing village on the East coast of St. Lucia. Extremely poor town. We left the provisions with the church/shelter and the driver began to talk about the great thing Yamaha did for the town. They came in a donated brand new Yamahas to all the fishermen!
Yup. What a way to grab the market.
Don't get me wrong, Yamaha, like Hondas and Toyotas are great! Early on the Japanese imports were sold at or less than their American competion to gain market share, just as the relatively recent Hyundi. They last along time, but when you need a part, it's going to cost....especially without competition. Ok, enough on that, but it is important to know where you are going to live, cruise and what parts you might need.
6. Naturally Aspirated vs. Turbo. I'll try to let this beast sleep, but note the turbo discussion on the Topica site and others will get into "carbon build up, rebuilds, turbo failure and maintanace tasks". Do you methodically maintain everything aboard and would you 'like' to add this to the list?
7. Drive trains. It's a package. You can't put George Foreman's body on PeeWee Herman's legs! Same with engines and boats. The HP, Torque, RPMS, have to be matched to transmission Ratios and propeller Diameter and Pitch, to have the boat do what you want it to do. Increasing torque can give you the ability to add pitch. Just adding HP without changing final drive rpms, will basically keep you at the same speed, because the prop is going no faster. Adding HP and using it by moving more water is accomplished by changing transmission ratios or more easily, adding pitch to the prop. Decreasing prop size to save money or changing to a folding or feathering propeller will most always will not give you the surface area needed to propel the CSY in rough water as well as the std. size prop. Auto Prop, might be an exception.... Displacement vessels should restrict their final prop speed to between 700 and 1000 rpms to avoid slippage and cavitation. Gear accordingly. Adding HP might suggest changing the shaft strength(you cannot change diameter-you are limited to 1.5"). To do this, if you upgrade, Aquamet 22 stainless steel seems to be the recommended material. It is extremely corrosion resistant and formulated to take engine vibration. Aquamet 19 is similar but not as good with vibrations...fine for shafting a new rudder though.
8. Price. discussed above
9. Dig deeper. Ask, ask and ask again, dig deeper into the subject, until you really feel satisfied. It's certainly better than digging deeeeeeper into your pocket later.
Points I noted this round of discussion:
1-Most folks would like to be able to cruise at or near hull speed.
2-Speed is not a constant and is subject to weather and wave conditions.
3-Fuel consumption varies with engine size and amount of effort demanded from it.
4-Some engines parts are getting hard to find for some engines but some are still serviced worldwide.
5-Yamaha's inboard is becoming a common choice.
6-Naturally Aspirated engines vs. Turbo choices will be debated for a long time to come.
7-Drive train and performance includes engine, transmission ratios, propeller diameter as well as pitch.
8-Changing engines is more than likely financially more costly and labor intensive, than rebuilding one or a direct replacement.
9-Dig deeper into all comments made.
1. To be able to cruise at hull speed, the engine needs to be able to run continuously at less than max and allow the boat to do 1.26 X the Square Root of the waterline length. (1.26 used here is for fat boats like ours.........a newer streamlined underbody would use 1.35 or there abouts)
This gives the 44 a theoretical hull speed of about 7.5 knots. Note that when motoring up to 5 or 6, the wake is minimal but when trying 7 or 8 the wake drastically increases. The force required to move the boat through the water (and move the water up into the atmosphere causing a wake) is increasing radically the faster you go. The boat is trying to plane, bow up, stern down. The ideal is to be able to get close to this 7.5 for a 44 in moderate conditions. Doing 6 or 6.5 is easily doable and a whole lot less expensive.
2. Flat calm reduces resistance to the hull and allows it to gain speed slowly over time to reach cruising speed. Throw in some 1 or 2' waves will slow down any drive train combination, but these small waves, or larger, will have less effect on larger engines and larger diameter props.
CSY didn't put a 24" prop on their boats because they liked to waste money. Larger diameter props, are a design element of displacement boats; bigger diameter/smaller pitch. If you want to go fast with a planing hull, it is the opposite; reduced diameter and increased pitch. To give a radical example, consider instead of your diesel engine, the manufacturer placed a 75 HP Outboard Engine on your boat(OK, even with an extended shaft). You could make the engine scream, but the small prop would give poor boat acceleration and have little effect against headwinds or waves. Point made?
Props are also designed with overall surface area integral to its intended use. Sailboat props are normally contain a surface of less than
 50% of the overall area of the circle. Powerboat props usually go about 70%. That means, when looking at your prop from astern, the sail prop covers half of the available area that water has to pass or grab, and power props grab 70% of it and also restricts water passage by 70% when sailing. Props with 5 or more blades are used for grabbing even more water and are common on tugs, w
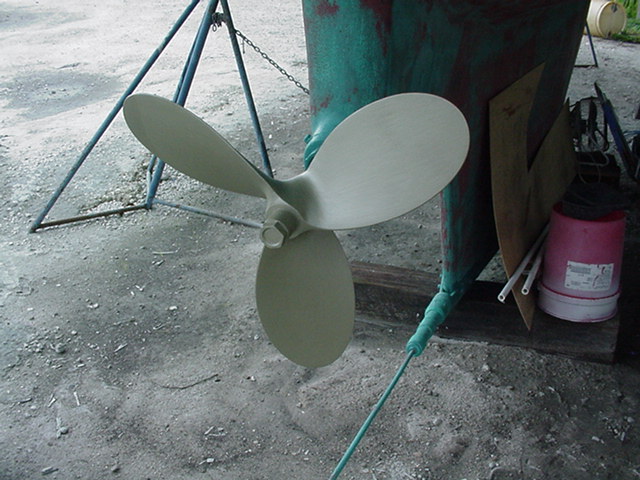 orkboats, ships, subs and can use 100% or more of the circle by using overlapping flukes.
Original 24"Prop of CSY
Since sailboats 'sometimes' really like to sail, 50 % surface area or less is the rule. I have seen smaller 3 blade power boat props
on an Antigua and the owner said it was fine. I've heard 20" for CSY's and believe their owners are happy. I have heard owners of max props, Martecs and auto props all tell of the great performance. Never, have I heard a complaint, about a change from CSY's 24", 50% sail prop design element, but the differences are very noticable. Martecs and Maxprops "flat blade" design can at best give you about 85% of the efficiency of a standard prop because the standard prop flukes are designed to create lift. You will never get the same speed 'motoring' with a feathering or folding prop, at the same rpms
 as you will with a properly pitched fixed prop. As one owner did, increasing his pitch from CSY 15" to 17", helps because that is a 13% boost in pitch. In calm water you can expect a boost from near 6kts. to near 7kts. With
 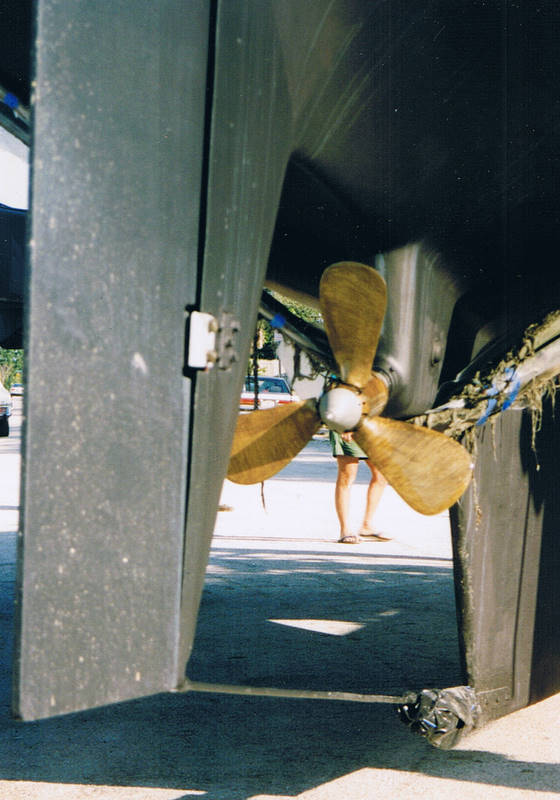 75 HP, you can repitch to 18". In choppy water you will still need diameter. Ten years ago, I installed a 24" Martec, 3 bladed feathering prop. It was great for sailing, but I lost a knot under power even though I tweaked it's external pitch adjustments.
Martec, 3 blade, feathering, 24" diameter propeller at left
3a. Fuel consumption. Much ado about nothing! I never heard of a Ferrari owner complaining about gas mileage, did you? Many owners have more into their boats than it would take to snap up a used Farrari, so come on. I put a grand a year into my boats tank (maybe) and alot more into my car. If an element like 1.5 gallons/hour or 2, or nail it to the wall for a few hours and burn 3, is really going to effect our cruising speed over time, then I'm talking to the wrong group!
3b. Engine life. I've had my boat 15 years and have put less than 2000 hours on. (True, I work on it too much and sail too little, but) I have traveled from the Chesapeake to Mobile along the coast. Around Florida a couple of times. Across the Gulf of Mexico to Pensacola a handful of times, up the Tombigbee waterway from Mobile, Alabama up to Kentucky, then all the way through the Cumberland River and Tennessee River, then back to do the Florida Keys a couple of times and yes some local daysailing. Fifteen years, less than 2000 hours. My old Lehman will last 15-50K hours without a rebuild, so I guess I'm good for another century if I keep spares:)
4. Parts. IF you wish to keep your engine, spend some time and you will locate a part, or rarely you can have something else made or adapted. If the engine is an antiquated design, using an engine that CSY used and built their stringers for, might simplify your hunt and reduce your cost. Ed Marill exchanged his engine for a totally rebuilt Perkins 4-236, 75 hp. for about $7000. if I remember correctly. No major projects like stringers to cut, extensive glass work, and adaptation of systems, transmissions or props. I've done them all. Ed did repitch his 24" CSY prop to 18" and was able to lower his rpms and gain hull speed while cruising. [ A 3" increase in pitch is a 20% increase. In theory, 20% more forward movement in the same period of time or RPM's. 6+ knots is now 7.5.] Later, he added a 23" Auto Prop and was very satisfied with it as well. Like probably most owners, Ed chose not to do the majority of work himself but to hire a pro for engine install. I'm guessing he laid out somewhere above $10,000 to complete the engine replacement/upgrade. I'm also guessing that total cost for an installation would run $20,000 for engine/material/labor on an engine install of a different configuration. Some of us are capable of doing our own work and finding good shops or outlets for parts, to keep costs down, but it is still a major task.
5. Yamaha. My 2 cents. Remember Evenrude, Johnson, Murcury? Sure they are still around but their marketing is not up the the imports. Maybe even their product is more similar to Chevy or Ford and thus are loosing the import battle, but certainly are not the Scott-Atwaters or Lawsons or Elgins of yester-year. Marketing is more decisive in how we now live than engineering. Sad.
Thirty some odd years ago, I was a marketing major so when I got an eye opener in St. Lucia, it all made too much sense.
We had been on charter and when leaving I asked the driver to detour if necessary to find a place to leave our extra food and supplies. I did not want them to be left for the Moorings community.
He drove to a small fishing village on the East coast of St. Lucia. Extremely poor town. We left the provisions with the church/shelter and the driver began to talk about the great thing Yamaha did for the town. They came in a donated brand new Yamahas to all the fishermen!
Yup. What a way to grab the market.
Don't get me wrong, Yamaha, like Hondas and Toyotas are great! Early on the Japanese imports were sold at or less than their American competion to gain market share, just as the relatively recent Hyundi. They last along time, but when you need a part, it's going to cost....especially without competition. Ok, enough on that, but it is important to know where you are going to live, cruise and what parts you might need.
6. Naturally Aspirated vs. Turbo. I'll try to let this beast sleep, but note the turbo discussion on the Topica site and others will get into "carbon build up, rebuilds, turbo failure and maintanace tasks". Do you methodically maintain everything aboard and would you 'like' to add this to the list?
7. Drive trains. It's a package. You can't put George Foreman's body on PeeWee Herman's legs! Same with engines and boats. The HP, Torque, RPMS, have to be matched to transmission Ratios and propeller Diameter and Pitch, to have the boat do what you want it to do. Increasing torque can give you the ability to add pitch. Just adding HP without changing final drive rpms, will basically keep you at the same speed, because the prop is going no faster. Adding HP and using it by moving more water is accomplished by changing transmission ratios or more easily, adding pitch to the prop. Decreasing prop size to save money or changing to a folding or feathering propeller will most always will not give you the surface area needed to propel the CSY in rough water as well as the std. size prop. Auto Prop, might be an exception.... Displacement vessels should restrict their final prop speed to between 700 and 1000 rpms to avoid slippage and cavitation. Gear accordingly. Adding HP might suggest changing the shaft strength(you cannot change diameter-you are limited to 1.5"). To do this, if you upgrade, Aquamet 22 stainless steel seems to be the recommended material. It is extremely corrosion resistant and formulated to take engine vibration. Aquamet 19 is similar but not as good with vibrations...fine for shafting a new rudder though.
8. Price. discussed above
9. Dig deeper. Ask, ask and ask again, dig deeper into the subject, until you really feel satisfied. It's certainly better than digging deeeeeeper into your pocket later.
Saturday, October 29, 2011
Hard Tops/Bimini's and Dodgers
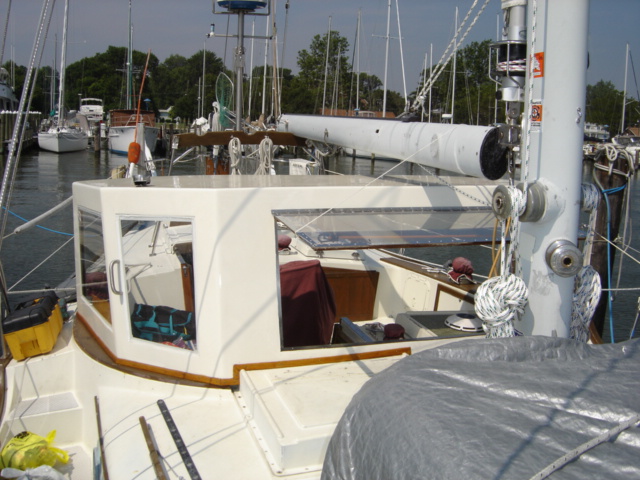
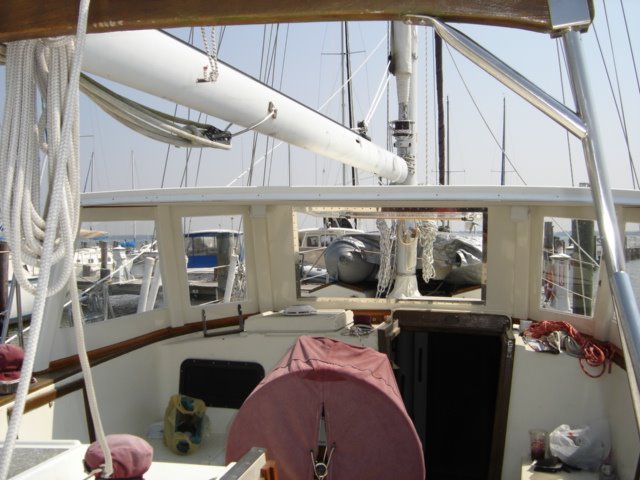
Only a few of the brave souls owning CSY center cockpit vessels have ventured into the unknown and attempted hard tops, hard dodgers or hard enclosures. There is 'much' to the task.
SV Magic Kingdom, owned by Ernest Kraus, had started the project above, on his WO last year.
Dave McCampbell is now making the aluminum one below. See lots more of his work at:
http://www.svsoggypaws.com/deck.htm#dodger

Below this, are photos of the Walk Over DouDou, which sports a custom enclosure of the cockpit. An example of an extensive modification, that is not a CSY Pilothouse but seems to be something some sailors might be interested in. The vessel is for sale through YachtWorld.com)
| |||
 |
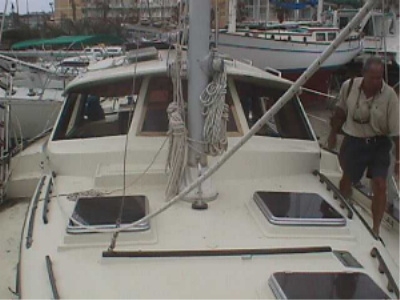
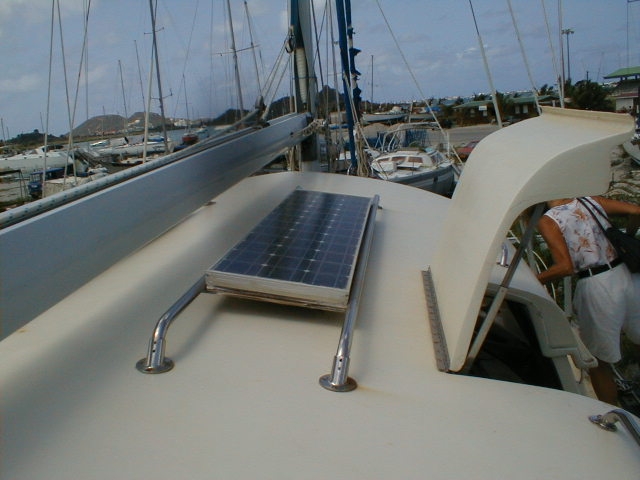

Peter Rabbit's top, is sho
 wn below, during const
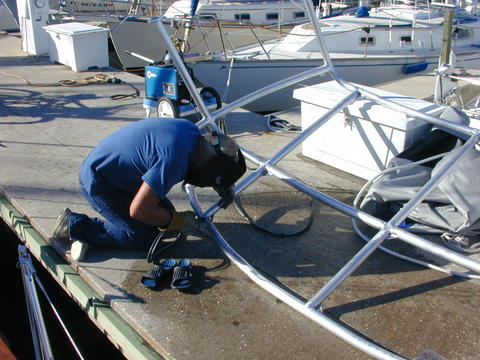 ruction.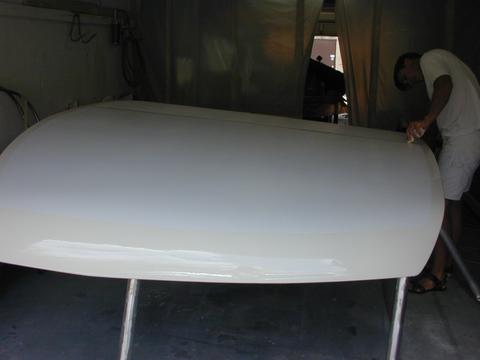
All involved endless hours of forethought in design and construction. Certainly worth mentioning such ambitious tasks. It seems Magic Kingdom is plywood. Peter Rabbit is a fiberglass section over an aluminum welded framework, as is the custom/commercially built bimini of Jim Dill shown below.
Chilli Pepper, Marathon Fl. .....................
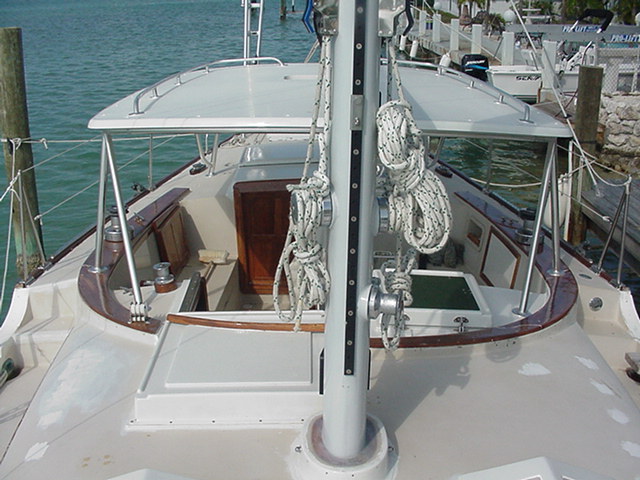 ............................owned by Jim Dill. Beyond that is a composit: half commercial built and half owner built, that is being finished now by Dave McCampbell. Dave designed his framework then shopped for a builder. Now he is finishing off the top and sides on his own. Be sure to check out his efforts at http://www.svsoggypaws.com
I believe that looking around the marinas also pays benefits. Pacifico's hard top was built by a past owner and seems to work just fine.
--A Morgan, Out Island 41 was also found in the same harbor tied to a dock, maybe forever, but it had a significant bowsprit and a very well thought out HARD DODGER. think of what you need and b
 uild it!
Pacifico, on left.
Morgan OI, 41' with an attractive hard dodger binimi combo, Roatan Honduras. Functional yet with style.
Thursday, October 13, 2011
Cutting a Keel: Deep to Shoal Draft
 CSY utilized a concept within their hull design, that allowed 2 models of Draft. On the 44' model the drafts were 6' 6" or 4' 11", deep or shoal. Similar differences were available for the 37 and 33. So, the 19" difference could either NOT be originally built in to the hull, by way of inserting a plug into the mold to take up the space, and then laying up the interior glass works, without the deepest section, or, cut it off sometime later.
Certainly there are fans of either shoal or deep drafts, but this modifiable keel gave CSY an edge on their competition. You could have your cake and eat it too, leasing your boat to the Caribbean Charter f
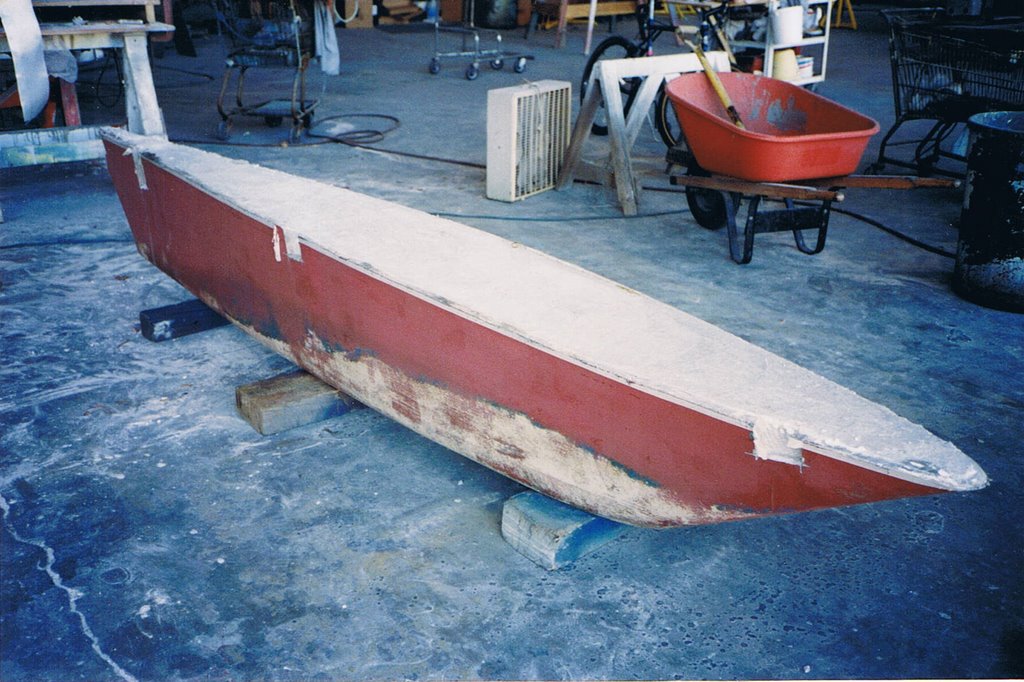 leet as a deep draft and then if you required less keel to bring the boat home, you could cut it off. There are pros and cons as to the handling of a CSY as deep or shoal draft, initial and overall stability of either, leeway with the shoal keel as well as whether or not ballast was put in at the factory or added later to make up for the weight lost when 19" of keel was the cut off, or omitted from the building process.
I took these photos at Embree Marine, on Salt Creek, St. Petersburg, Florida, back in the very early 90's. At the time, the charge was between $3-3,500. for the modification. It seems the concept this yard used, and it was a yard that did many CSYs in the past, was to cut into the side of the keel at 3 places on each side and remove a small square of fiberglass about an inch deep. One block forward, one aft and one near center. This gave them a visual indication of where the fiberglass inner, "2nd bottom" was approximately. Then they marked a line around the keel and began to cut off the bottom section with a circular saw. I suppose they had to leave the hull slung in the Travel Lift and add jack stands to be somewhat stable and safe, but the keel drop should have separated without too much effort after the glass was cut.
Once the lower section was removed, grinding the rough cut somewhat, then fairing the seam, seems next. I cannot verify now if it was done by Embree, but if I were to do this, I would grind off some of the outer glass above the cut, and layer a good amount of new fabmat material over the seam and bottom using epoxy resins for the best bond, to effect a total cap on the project.
Finish off with some fairing and bottom paint.
*Note: I recently stopped by Embree Marine, 201-16th Ave. South, St. Petersburg, Fl. 33701 and spoke to the yard manager about this work. He said, Chad Shakespeare is the guy to talk to as he has knowledge of the prior jobs done by them. 727-896-0671.
Saturday, September 10, 2011
Steering Sheaves in Cable Systems aboard Yachts
(Written a few years ago.)
This sprin g, I was concerned about a Coast Guard alert for a CSY 37 that a few weeks earlier had been anchored near me. The vessel was reported as missing on on a crossing to the Bahamas. All ended well luckily but I feel compelled to spread the word again as to why there was a problem; a problem not rare to 25 year old boats.
Obviously no one wants to loose steering, no one; but reasonable maintenance should prescribe disassembly of our simple cable systems to check components. We know of failures and near failures and the fix is straight forward.
The steering failure that caused the
 CSY 37 to go missing for awhile and luckily nothing worse, was a rusted through steel bracket under the binnacle where sheaves attach. It crumbled, collapsed! The problem was beyond surface rust. A basic check of this bracket should be high on the maintenance list of any owner. These brackets came in bronze as well and should be sound if they are.
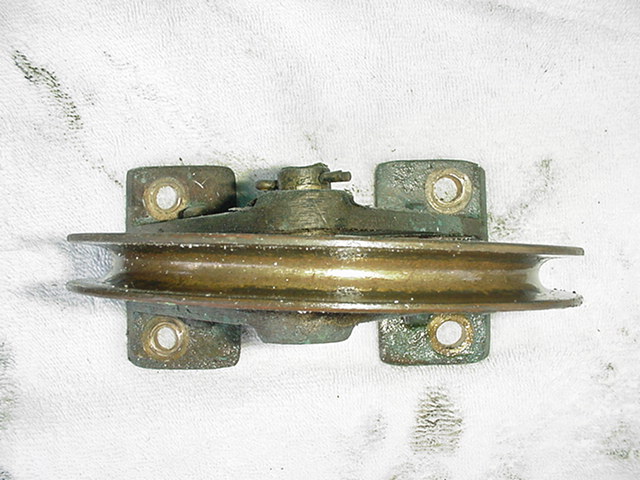
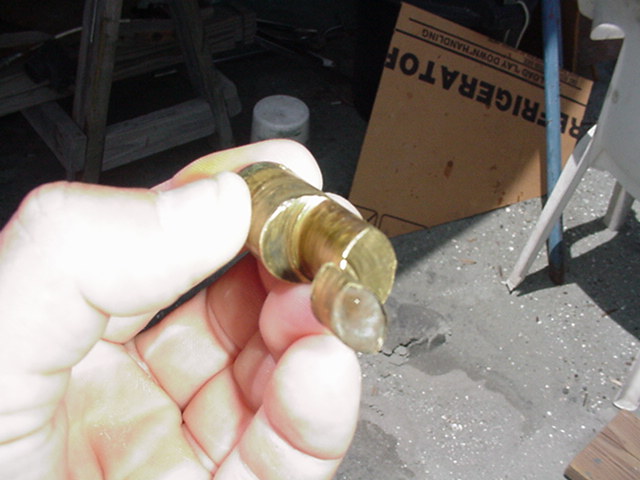
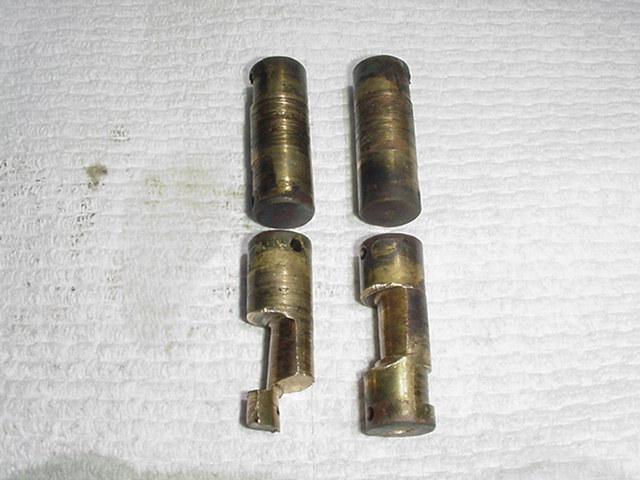
At left, photos (taken of my gear!)show a near failure of the bronze sheave pins. Edson now makes the replacement pins of stainless steel/a harder material!
Plenty of time has been spent on projects in my lazarette but I did not catch the wear on the sheave pins until I took the cable system apart to INSPECT.. Disassembly of the cables to work in the lazarette allowed me to feel the sheaves, now without tension on them, and the obvious 'wobble' scared me. The TOP photo shows a tilting of the sheave. Visually, that should alert anyone that there is a problem. The MIDDLE photo shows the pin was ALMOS; the evidence of ONE sheave pulling one way and another pulling against it....but almost worn completely through. This would have been disaster. The BOTTOM photo shows 2 Fair pins, 1 Bad pin and 1 absolutely Dangerous pin.
Replacement of the Oilite bushings in the sheave costs only a few bucks, so have a shop to that for you as well.
OK, so your not going to cruise far. How about when you are turning into your marina under power and you have to turn past a few of those nice expensive power boats. Want to loose steering then?
(originally posted 9/20/06)
This sprin
 g, I was concerned about a Coast Guard alert for a CSY 37 that a few weeks earlier had been anchored near me. The vessel was reported as missing on on a crossing to the Bahamas. All ended well luckily but I feel compelled to spread the word again as to why there was a problem; a problem not rare to 25 year old boats.
Obviously no one wants to loose steering, no one; but reasonable maintenance should prescribe disassembly of our simple cable systems to check components. We know of failures and near failures and the fix is straight forward.
The steering failure that caused the
 CSY 37 to go missing for awhile and luckily nothing worse, was a rusted through steel bracket under the binnacle where sheaves attach. It crumbled, collapsed! The problem was beyond surface rust. A basic check of this bracket should be high on the maintenance list of any owner. These brackets came in bronze as well and should be sound if they are.
At left, photos (taken of my gear!)show a near failure of the bronze sheave pins. Edson now makes the replacement pins of stainless steel/a harder material!
Plenty of time has been spent on projects in my lazarette but I did not catch the wear on the sheave pins until I took the cable system apart to INSPECT.. Disassembly of the cables to work in the lazarette allowed me to feel the sheaves, now without tension on them, and the obvious 'wobble' scared me. The TOP photo shows a tilting of the sheave. Visually, that should alert anyone that there is a problem. The MIDDLE photo shows the pin was ALMOS; the evidence of ONE sheave pulling one way and another pulling against it....but almost worn completely through. This would have been disaster. The BOTTOM photo shows 2 Fair pins, 1 Bad pin and 1 absolutely Dangerous pin.
Replacement of the Oilite bushings in the sheave costs only a few bucks, so have a shop to that for you as well.
OK, so your not going to cruise far. How about when you are turning into your marina under power and you have to turn past a few of those nice expensive power boats. Want to loose steering then?
(originally posted 9/20/06)
Monday, July 11, 2011
33' CSY, " Rhapsody"
.JPG)


 Dag's 33, is a fine example of the 33' CSY model, shown here at anchor in No Name Harbor, Miami.
Rhapsody on the hard/deep keel option. The staysail has been modified to ditch the club foot original to the design and instead add a furling system and double sheets led to blocks on the coach roof corners.
New anchor.
Had all the exterior varnish stripped off last year and applied 17 coats of Epifanes varnish.
Also screwed on SS rub-rails on the teak from the bow back to the spring-cleats.
A new 20 KG Rocna anchor sits on the bow. Very impressed with the anchor so far.


Showing her clean seaworthy, CSY lines.
Rhapsody during hurricane Wilma. I am happy to say there was no damage to Rhapsody:
She was a bit shaken, but not stirred. At least 13 docklines are holding her in place and there is
also lines across the canal holding her off the dock. Had I known how severe the storm would be,
I would have removed the sails...
Helm mod...Mounted a chart-plotter on the pedestal 2 years ago. I had to make a bracket out of aluminum to mount the plotter, also used bimini-top hardware with rubber-bushings to clamp on to the tubing.
Here is a picture of the bracket and hardware: The plotter is a S-H C180i
hooked up to an AIS "engine" displaying ship traffic up to 29 n.m. aw
 ay.
ay.Helm 2.
The plotter is also connected to the Simrad autopilot, to the primary DSC VHF radio and also sending GPS updates every 20 minuttes to 406 EPIRB mounted just inside
the companion w
 ay.
ay.Double Trouble: This is Rhapsody and Cinnebar sharing a dock in Fort Lauderdale. Rhapsody seems to be carrying the draft of a cruising boat.
Midship cleats nicely added.
This one is an experiment on cutting a viewing port in the "storm-shutter" kind of
plexiglass panels protecting the real house windows on the CSY 33: Had to
make several of these clear round plexi pieces as they would crack when bent.
Finally had to use glue, then SS bolts and nuts.
Also mounted an compass on the inside so as to make this a poor-mans "Pilot House"
In bad weather and with the auto-pilot remote I can steer the boat from the inside.
As can be seen, the hatches and all the external fiberglass on the boat have gotten
some fresh gel-coat sprayed on.
In this shot, note the block added to the corner of the raised saloon roof for sheeting the staysail. It's a good lead and works well for this conversion.
While Dag is quite modest, I have to say, when I viewed Rhapsody, I was immediately impressed with the thought put into each and every mod and certainly, the detail and quality of work. (sorry Dag, I h
 ad to add that! :)
In the end, actually both ends(a pun), the anchoring systems have been modified too.
For the stern anchor, Rhapsody uses a Danforth mounted on the aft rail, within immediate reach of the helmsman and can be quickly deployed. This is a real safety measure. A length of chain and the anchor rode, is stored just inside the coaming and below, in a secure locker specially set up by Dag. If and when needed, the helmsman can get a stern anchor down and maybe save the day, or if sailing solo, has everything needed to handle his boat and secure it bow and stern. Nice!!
Not to be overlooked since it fits in so well you might not notice, is the nicely installed windlass and new Rocna anchor. Both of these seem to fit as if originally designed. The simplicity, is actually just beautiful. Form and function, hand in hand and certainly well executed.
A fine solution also for the spare anchor. Easy to reach Fortress is mounted on deck in custom blo
 cks between the two
 hatches. Simple yet functional.
Originally Posted 11/28/08
Subscribe to:
Posts (Atom)