The prior owner of CSY 44 Walk Over now named "Zeus" is trying to find out if she survived Hurricane Dorian, which devastated the Abaco Islands of the Bahamas last year.
If anyone has any information would you please post a "Comment" to this request, or if you wish, email me directly at s.v.memoryrose@g----.c-m
Comments can be posted by clicking on the word, just below this message.
Thank you.
ron sheridan
Tuesday, February 25, 2020
Tuesday, March 12, 2019
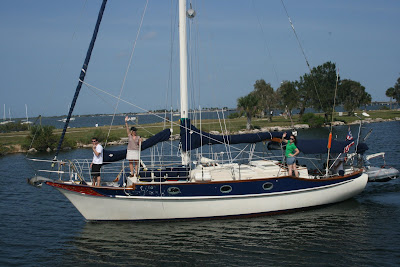
The Author has sold his Memory Rose. CSY Pilothouse Ketch-highly modified for World Cruising
Sailing Vessel Memory Rose was sold to a retired Swedish ship captain. The vessel left the U.S. heading for a circumnavigation as per it's new owner.
Formerly, the vessel was shown at the St. Pete Sailboat and Yacht Show in St. Pete Florida and afterwards was "Featured" in a 5 page spread, in the 2015 Spring addition of Cruising Outpost magazine. A very special yacht!
Viewers at the show were in awe at the features, modifications and condition of the vessel and without surprise, not one comment was heard regarding the the price.. except 2, that we priced her too low.
World Cruiser, ready to go!
Memory Rose is a sailing version of a "Hummer on Steroids"... with a luxury interior.

Ready for a Circumnavigation or.............., this presented a rare opportunity for an astute sailor.

Details can be found by reading the posts in the Index on the right side of the page.

Also extensive information on upgrades and modifications to Memory Rose is available on her site. http://memoryrose.blogspot.com
(Once there, use the Index on the Right side of page to search her projects and modifications)


Intake with easily removable custom screen.
Solid copper machined "lightning ground plate under Main Mast."
CLICK ON ANY PHOTO TO ENLARGE!


Saturday, March 12, 2016
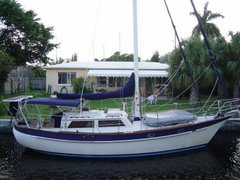
Pilothouse CSY 44

The ketch rigged Pilothouse version of the 44' CSY hull was a design ahead of it's time. Very traditional look overall, resembling European wooden designs of years gone past yet, like the Walk Over design already offered at CSY, the Pilothouse used all the best of the mid 70's technology, in a heavily built fiberglass modern hull. The architect, Peter Schmidt, obviously translated some of his Dutch old world heritage into the layout
 and design. At first glance, it was easy for one to say, "I want to charter that, or I want to own that."
One hull design platform for all CSY 44 models simplified production, yet with the eventual 4 different interior and deck mold options, the market was easily satisfied.
The Pilothouse was the 2nd of 4 final designs, the Walk Over (WO)being the 1st, the Walk Through(WT) and Bottomliner(commercial fishing version) were 3rd and 4th.
Click Photos to Enlarge.
The first Pilothouse actually had its interior finished at sea, on the way to the New York City Boat Show, in January 1978. The hull of #1 was dated Dec. 1977, and was the 4'11" shoal draft. CFO of CSY at the time was Martin Dean and he wanted it for his personal vessel after the boat show. He told me he and his wife wanted to cruise local West Florida waters, so the shoal draft was more appropriate for him. Like all 44's, there were two (2) draft options: 4'11" for shallow water access or 6'6" for sailing performance.

Cover of Maptech's 1980 East Coast Chart Pack
The Pilothouse, sailing to NY with the cutter right behind and off in the backround, actually graced the cover of the East Coast Chart Pack in 1980. The photo shows Frank Hamlin at the helm pressing on to NY.
The show was a success for CSY and the crowds at the "Colosseum" on NY's, 59th St. and Columbus Circle lined up for viewing. My boat, Pilothouse Hull #2 was sold to a doctor across the river in Perth Amboy, NJ from this show. Another, yet to be built Hull #3, had a contract written up for a pilothouse for an attorney out in Washington State. He actually called his friend Tom Foster from the show, to suggest strongly that he buy one too. Tom waited a month to see show printed material and the delay caused his hull # to go from 4, to #8! Yes, CSY's sold well at the show and the Pilothouse design was off and running! Naval architect Frank Hamlin was one of the N.A.'s at CSY and at this time. About this time, Peter Schmidt signed on full time. Frank Hamlin was then in charge of the Pilothouse project. It seems that many of the Pilothouse's built were kept private and did not enter the CSY Charter Fleet.

We move well in Light or Heavy air and surprise the common bragards out there. The PH performance can shut 'em up quickly!
CSY had not wanted to build a Walk Through model originally and spoke much to this point in early CSY brochures and literature. It opted for the Pilothouse configuration instead, to derive ultimate live-a-board qualities. As Queen of the fleet, she was priced well above the Center cockpit WO version. The company was aware of the extra cost to build this model. It seems only 22 of this Pilothouse version might have been built but at this point there is still uncertainty as to what happened to 5 or 6 of the slated hull numbers in the teens. We can find numbers but not the boats themselves. Possibly a plan to put a short production run, with numbers put aside, for a charter fleet that never materialized, but that's only a guess at this point.

Even dockside, they stand out; kinda like a Muscle Car does- parked but Ready!
Why build a pilothouse version? Well, CSY's competition for the charter trade were offering walk through designs.
Click any photo to Enlarge It.

There are obvious benefits to a Walk Through in general but CSY initially saw negatives. CSY went beyond just interior access issues with the pilothouse design tried to omit the negatives they felt were limiting in the center cockpit WT design. The Pilothouse model used the same hull as their standard 44' Walk Over, but the design allowed full access in the living quarters without ever needing to cross the cockpit of the WO. If you wanted a cup of coffee or a beer, you need not go outside from the aft cockpit to get it. If you were in the saloon and wanted to check a chart, back in the aft cabin's navigation station, you need not go out in the rain/sun to do so. If you were butt ass naked, you could enjoy your home afloat in private.......No showing off to the anchorage required! ;) So, now uninterrupted interior access was available in a CSY.
-Tankage was improved with a 5 tank layout/options for 6. Total tankage was 5-600 gallons (options for more)and apparently plumbed during construction to fill the needs of the new owner's demands for fuel and water. My boat has 3 fuel tanks totaling 325 gallons and 2 water tanks totaling 250 gallons. Others PH's differ somewhat.
-Ketch Rig/with main mast moved 4' forward of the cutter configuration. This offered easy safe smaller sail areas for each sail, but the design actually increased overall Total sail area to 950 sq.ft.(early drawing show this at 937-but was corrected in later printings). The ketch rig offers the ability to sail with mizzen and head sail for an easy to work sail plan in heavier weather, but there was the additional complexity and cost of the extra mast and rigging. More info on Ketch/mizzen benefits here:
-Main Mast height was increased from 54' and 56' on the W.O.'s to 58'9" on the Pilot House versions! More stick, but simple single spreader rig.
Early tank testing and literature from CSY stressed the ability of these early configurations to keep full sail plans to 30 knots. This is unheard of on most sailboats and was not valid on the tall double spreader rigs CSY later installed on WT's and a few WO's. Added height and shortened boom of the P.H. gave a more efficient/powerful mainsail (higher aspect ratio). The ketch sail area added about 50 sq. ft. to the W.O.'s sail plan. Foredeck was clear space as now there was no club footed boom on a stays'l. A thousand pounds of additional ballast was added for compensation to the Pilothouse keel encapsulation/ note too, the double lead ingots used for ballast were moved aft and the sump was moved forward giving adequate space up there for a crew member to descend for any maintenance required for bilge pumps etc.
- The aft cockpit was the only aft cockpit offered in the 44 line up. It maintained the deep cockpit, high bulwark/backrests and 6'+ seats that CSY were given high marks for, but lost the 'patio' qualities of the W.O.'s excellent cockpit. The P.H. version, was now a serious "Sea" cockpit and underway, at anchor or dockside, was not adequate for large groups partying . Most entertaining quickly moves out of the sun or weather to the saloon area; which offers 360 degree views of paradise from within as well as plenty of ventilation. Of course, the standard CSY beer cooler was still built in beside the aft helm seat and it was a 'smiled upon' feature.
-A large Lazarette was added under the aft cockpit, that is absent in any other 44 CSY design. Plenty of storage and immediate access to the rudder, quadrants(one for each steering station), cables and sheaves. To elaborate: In my lazerette, we carry 4 dive tanks and equip for emergency dives, 25-30 assorted lines hanging along hull, an FX 85 Fortress anchor shaft, 6 life vests, Monitor wind vane steering paddle, 2 large buckets with boat cleaning gear and emergency items like extra snap shackles etc, oil and items for outboard and dingy. With all this, there is still room for a crew member or two to decend into it for inspection or work. This extra space was designed into the P.H. for below deck storage but immediately accessible from the cockpit.
-2 entrance companion ways: one from the cockpit, one from the Intermediate deck just forward of the cockpit, aft of the pilothouse. This was useful especially if crew or others did not want or need to disturb the privacy of the aft cabin/the Capt.'s Quarters.
-Full 360 degree panoramic view from Inside. A view that equals that of a trawler, but who's profile(read that windage) is less than a typical enclosed dodger on the center cockpit boats.
-Cavernous Interior in main living area: Saloon/galley open/combined area measures 9' x 15' locker to locker(port to stbd.) and bulkhead to bulkhead(forward/aft)
-Large U shaped galley: Totaling 9' of counter tops in 2 sections. Add to this, the 3 burner stove and the efficient top loading triple locker 17 cubic foot refrigeration system CSY was quickly know for. Extraordinary 15' of deep cabinetry behind the working spaces; the 3 sections of locker space plus an overhead 3' spice locker, offered more usable galley space than any other CSY design. A chef's galley.
What was lost?
1. The Workshop and Vice that later was incorporated into the Walk Through(W.T.) design *
2. Forward Showering Compartment of Cutter rigged CSY 44's
3. A 2 ton Fish Hold later available on the Bottomliner. OK, who wants that?! Keep your sense of humor...
*I modified my forward hanging locker and cabinet in the V berth area to grant me the workshop amenities and vice and others can do this too.
The showering compartment of the cutters, is a really nice feature but apparently cruisers choose to fill it to the brim as extra storage.
Just a curious observation, but in the late 80's, seeking a P.H. for myself, I investigated about 6 of them over 3.5 years; finally opting for Hull #2, then named "Sunrise" from Perth Amboy, N.J. All of them appeared to me to be somewhat or seriously denied the attention required to keep a boat pristine and shippy. I have no clue why that occured, but without defects or damage, I bought mine and cleaned her up.

Original Interior shot from CSY

Obvious in the last decade are the number of sail boat manufacturers building Pilothouse or Raised Saloon configurations. The trend does not negate the desire for efficient hulls but does demonstrate the longing of many to have more interior comforts. Schmit and Van Ost had their thinking caps on and were also listening to the market. Production of a fast comfortable Pilothouse design can be compared to anything built today. At 44', The CSY Pilothouse offers a surprisingly full list of features that todays other designs, have a hard time topping.
Originally Posted 1/12/10
Monday, January 05, 2015
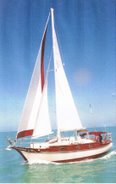
"JAZZ", a CSY 37' class act!
Peter and Jan Hibbard, have sent photos of their 37' CSY. The boat does not look 30 years old, does it! I've had lot's of querries for 37 photos and information and am glad that such fine quality material came in. Now others have something truly sharp to look at.
JAZZ leaving Titusville Florida for Bahamas "Abacos" in May of 2008.
Anchored in Green Turtle, Abacos May 2008. Trail boards refinished with Red Brightside and inlay with Gold Leaf enamel that is actually cement monument paint. All exterior bright work taken down to bare wood with heat gun and sander. Cleaned and bleached. 3 coats Natural Teak Cetol followed up with 3 coats of gloss Cetol. Hull cleaned with Awlgrip cleaner and followed up with Awlgrip polish.

Port interior - New foam cushions, navy marine vinyl piped in white. Sumbrella throw pillows. All bulkheads cleaned and then painted with white gloss Brightside. All interior woodwork above sole refinished with water based Varathane.

Saloon Forward from Companionway - braided rugs, various decor items like mirror, pictures added with Weems and Plath flower vase. Bulkheads white gloss Brightside and galley counter Formica prepared and painted with gloss Navy Brightside.

Captains Cabin Port Side Forward - Trimmed in blue and white decor, bulkheads white gloss Brightside and all trim water base Varathane.

Head Forward - Sole fiberglass sole coved in white Dri-Deck. Counter tiled and new faucet fixtures added

Galley Port Side Looking Aft - All counters and top of fridge refinished with Navy Brightside and all trim with water based Varathane.

Cockpit Looking Aft - Fiberglass floor covered with Dri-Deck. C Cushions (closed cell foam) custom made for seating. Throw pillows red and navy striped Sumbrella, Cockpit table refinished and striped with Navy Brightside with gloss white Brightside background. All exterior bright work in cockpit and around entire boat taken down to bare wood and refinished with 3 coats Natural Teak Ce/09tol and then 3 coats Gloss Cetol.
Originally Posted on 3/22/09
Update: 5 January 2015
I have just rec'd information that Jazz has been featured in Practical Sailor Magazine.
http://svsoggypaws.com/files/CSY/Dissecting%20the%20CSY%2037%20-%20Practical%20Sailor%20Article.pdf

JAZZ leaving Titusville Florida for Bahamas "Abacos" in May of 2008.

Anchored in Green Turtle, Abacos May 2008. Trail boards refinished with Red Brightside and inlay with Gold Leaf enamel that is actually cement monument paint. All exterior bright work taken down to bare wood with heat gun and sander. Cleaned and bleached. 3 coats Natural Teak Cetol followed up with 3 coats of gloss Cetol. Hull cleaned with Awlgrip cleaner and followed up with Awlgrip polish.

Port interior - New foam cushions, navy marine vinyl piped in white. Sumbrella throw pillows. All bulkheads cleaned and then painted with white gloss Brightside. All interior woodwork above sole refinished with water based Varathane.

Saloon Forward from Companionway - braided rugs, various decor items like mirror, pictures added with Weems and Plath flower vase. Bulkheads white gloss Brightside and galley counter Formica prepared and painted with gloss Navy Brightside.

Captains Cabin Port Side Forward - Trimmed in blue and white decor, bulkheads white gloss Brightside and all trim water base Varathane.

Head Forward - Sole fiberglass sole coved in white Dri-Deck. Counter tiled and new faucet fixtures added

Galley Port Side Looking Aft - All counters and top of fridge refinished with Navy Brightside and all trim with water based Varathane.

Cockpit Looking Aft - Fiberglass floor covered with Dri-Deck. C Cushions (closed cell foam) custom made for seating. Throw pillows red and navy striped Sumbrella, Cockpit table refinished and striped with Navy Brightside with gloss white Brightside background. All exterior bright work in cockpit and around entire boat taken down to bare wood and refinished with 3 coats Natural Teak Ce/09tol and then 3 coats Gloss Cetol.
Originally Posted on 3/22/09
Update: 5 January 2015
I have just rec'd information that Jazz has been featured in Practical Sailor Magazine.
http://svsoggypaws.com/files/CSY/Dissecting%20the%20CSY%2037%20-%20Practical%20Sailor%20Article.pdf

Wednesday, April 16, 2014
Index CSY 44 , CSY 37, CSY 33 -- right side of this page.
... right side of this page for........ CSY Index
note: once at the......... bottom of any page ....on the right side, click on OLDER POSTS. There is plenty more info.
Enjoy!
note: once at the......... bottom of any page ....on the right side, click on OLDER POSTS. There is plenty more info.
Enjoy!
CSY Pilothouse Ketch Memory Rose: Highly Modified
I had searched for 3.5 years in the 80's for just the right boat and kept coming back to this model. I found it extremely comfortable and well thought out. My goal was an ultimate offshore cruiser, but while our modifications have been extensive, I think many of the changes and upgrades probably would have been the type CSY company would have incorporated into the 44 over time if the company had remained in business.
The ketch rig does require a 2nd mast with all its fittings, rigging, sail, complexity and refitting costs, just one of the reasons the Pilothouse 44 cost more out of the factory. The aft cockpit is deep and secure;.. not...... expansive as it is, in the Walk Over's . I feel quite secure in it when the going gets rough as I can move about with confidence from one handhold to another but at anchor and entertaining, it only accommodates a small crowd before we find ourselves migrating to the saloon.
The Pilothouse version, with large fuel tankage of 350 gallons in 3 evenly sized tanks, erases guilt when reaching for the start button in light winds or if we just want to travel into the wind.
The tankage of 350 for fuel is great but 250 gallons for water is a plus of the Pilothouse design.
The Water Tanks were opened in 2000, the baffle removed and I physically got into then, in order to grind and sand the gelcoat inside. Then while inside... I glassed over the entire interior of tanks with a layer of fiberglass cloth and several coats of West System Epoxy. Next, a couple of coats of Micron 2000 Interprotect barrier coating, then final coatings of Ceram Coat to their specifications. Ceram Coat is an epoxy product with 90% ceramic particles and 10% evaporating material. Once applied, you and up with a glass lined tank........this product is used in the food industry for lining pipes and tanks for food production. Expensive, hard work, but our water 10 years after tastes like bottled water and lasts with not a hint of odors, ever.
Full controls and full instrumentation inside the Pilothouse, is relied upon often, but the steering is not in my opinion/having lived worked and sailed this beauty. It/the Pilothouse Inside Steering Station, is there as a safety backup and used by me, as a place to stay Out Of the Sun.... Out of the rain, and stay Comfortable during Night Watches... When OFF WATCH, I chose to slumber in the Saloon's berth so I could read all the instruments at the forward helm.
When offshore? I still prefer to be out on deck for optimum safety and control, on 10 minute increments. Step out! Look around! then....rest a bit more..
Old habits........
In many discussions 25-30 years ago, I learned of the potential problems of stainless steel. It is just one of those things that every boat owner should understand. I finally decided to modify Memory Rose with beefy External Chain Plates and over a few years of looking at researching, came up with a design I felt really comfortable with. The design is an adaptation from Steve Dashews Cruising Encyclopedia, Page 582. I modified his concept to fit our boat and had them built and then finally installed them in 2000 and so have a number of satisfied CSY owners.
(if you are looking////// you will find CSY's without serious UPGRADES have just Dump their 'value'. Stongest production boat built in the U.S. and with upgraded systems???? is worth every penny spent!
We ended up removing our teak cap rail AND teak toe rails. I glassed the Hull to Deck joint around the entire boat and made a custom 1.25" thick Genoa track of solid fiberglass/molded into and bolted through the deck.
Removed the CSY rub rail, as mine seemed to be beyond a good permanent fix for it's many minute cracks, and built a 3 layer thick solid teak rail at the decks upper edge. Took the Bronze half round molding from the original rail and added it to the new teak rail.
Pilothouse was strengthened inside with a custom fiberglass grid around all windows. Made custom series 6000 Aluminum HD window frames for inside 1/2" thick clear Acrylic windows. Then added 1/2" dark grey tint Permanent Storm Windows that are 2" larger than all window dimensions and screwed into the outer Pilothouse over rubber seals. One inch of glazing in 2 layers....bullet proof heavy weather protection and 90% UV protection.
Insulated the upper pilothouse and underneath side decks as well as aft cabin with 1" of extruded Owens Corning Pink Board. This keeps the boat much cooler in tropical sunlight. No awnings necessary.
Engine is a Lehman Super 90, naturally aspirated 4 cylinder diesel. 8 years after ownership I cut and reglassed engine beds to obtain perfect alignment of engine to shaft. Added Purifiner bypass Oil Filtering system for optimum cleaning of oil, removed engine diesel fuel filters and added instead a Racor 500 in a remote and easily accessible location to make changing filters an easy project. Added double Racor 500's between triple tank manifold valves and engine with 2 micron filter in one and a 30 in the next and also mounted this in a comfortable location.
Transmission is the original but I changed out the reduction gear assembly from 2.91 gears to 2.57. My engine has more power than the boat needs, so by making the prop turn faster at any RPM, I can lower the RPM's to get the same speed, while keeping the engine in it's proper torque and horsepower range.
For the past few years, I have averaged about 1.35 gallons per hour fuel consumption. This covers all hours, of idling, true, but I usually motor at 7.6 to 8 knots and rpms are 1650-1850 depending on sea state. Engine tops out at 2300 with full throttle, about 10% under max rating of 2500. Note, propeller was also repitched to 19" and custom balanced. Now it's a 24"Diameter x 19" Pitch, not the original 24 x 14 or 15.
11 Through Hulls were reduced to 4. One 2" Forespar Marlon valve now is the Only Inlet valve. It leads to a custom fiberglass Sea Chest and all water for engine, 2 heads, air conditioner, salt water washdown, 12vdc refrigeration, are all separately valved from this chest. 3 outflow valves, one for each head and one for galley sink.
Having helped rebuild a broken CSY rudder in the late 80's (the owner backed into a sandbar), I decided to build a stronger rudder before going cruising. I opted then too to make it more modern in design and 15% larger in area. Read some books, looked at many rudders and went to a couple of manufacturers first. then talked to a couple of naval architects about my ideas. Finally built the rudder in 94. Also added turbulators to side gap between skeg and rudder for improved water flow.
A big change I made and as you see there were several, was adding a bowsprit to move the headstay forward 6 feet. The Original Sail plan of the CSY Pilothouse Ketch worked fine and was well balanced . However, I wanted a stay sail, larger genoa and generally more sail area. Adding the 'sprit' created a Double Headsail'd Ketch with a larger heads'l by 125 square feet. Also adding roach to the leech of both the main and mizzen sails, brought my overall sail area for working sails from 950 to 1150 square feet. Heavy boats like having 'more' sail area in light airs. It offers the easy option to sail with working sails, rather than motor; also negating the need for messing with optional light air sails such as code zero's, spinnakers or drifters. Moving the headsay out 6' forward added the benefit of using the original stem location to mount the bottom of a new stays'l stay not otherwise offered on a CSY Ketch. This stays'l is installed on a Profurl of equal size to the Profurl on our headstay's genoa, both Profurl NC42's. The Staysails additional 260 square feet brings our total working sail area up to 1400. This amounts to a 50% boost of permanent sail area from the original 950 sq. ft., 'in place', spread out over 4 sails rather than 3. Many adjustable sail combinations and lots of power in Light Air where a heavy boats need some help. We also do carry an original nylon mizzen staysail and new asymetrical spinnaker for real light air fun or longer 'one tack' passages; Both of these light nylon sails are containable within "Socks".
Many other interior and exterior modifications were made over the years and too much to put here at least now. Some mods are individual posts shown on my personal blog http://memoryrose.blogspot.com and others are yet to be written up. You know how that goes! Will probably edit this post in the future but for now...the fat lady has sung. Stay well and keep smiling! ron
Monday, April 14, 2014
CSY 33 Search by Prior Owner
The Jerry Stanley, the original owner of a CSY 33' , is looking to find his old boat. He heard it had been in the Tarpon Springs area of Florida back in 2008.
His request for info from Dag Hansen, our CSY 33 guru, stated:
"Your help would be greatly appreciated, it is like our lost child."
So, if anyone knows the whereabouts of this boat please contact Jerry at: ghstanley3@verizon.net
'it sometimes takes a village!.....................' ;)
His request for info from Dag Hansen, our CSY 33 guru, stated:
"Your help would be greatly appreciated, it is like our lost child."
Original Name: Bitoa
Hull Identification No.
TXY330010778
Official No. 600999
Manufacture Date: 1978
Date of Sale: Oct. 24, 1978
Last Port: Tarpon Springs, 2008
No. 1 hull
So, if anyone knows the whereabouts of this boat please contact Jerry at: ghstanley3@verizon.net
'it sometimes takes a village!.....................' ;)
Sunday, October 14, 2012
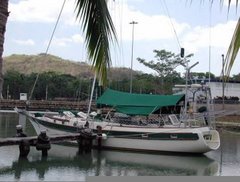
Hard Top for Songbird
| ||||
| ||||
As promised, I'm forwarding pictures of Songbird's hard bimini.

The bimini was manufactured at Catamaran's in Rio Dulce. Les, the yard manager there, welded the 1" stainless supports for me and made the curvature to my specs, including matching the color in the gelcoat. Les then sub-contracted to have the glass-work done on site under his supervision. The top was completed and installed even sooner than I had requested (I wanted to leave in three weeks!) and came in just a little over the cost estimate. It was very reasonable. I purchase four 70 watt solar panels from the shop at Ram marina (the name escapes me)--I mounted them and they did the connections for me. The wires for the solar panels go through the forward starboard post and into my electrical box, from there to the batteries.

The structure is very sound. I could probably walk on the surface, but try to confine any climbing up there to the parts supported by the frame. Once back on the Hudson River, I made new roll-up windows to create a complete inclosure. I'm very pleased with it. It's water-proof, of course, and provides good visibility with the windows up or down.

I vacillated about doing this for a long time because I have a real love-hate relationship with the bimini. I love the protection but hate the restricted visibility, enjoying it greatly when the top is completely off. For that reason, when I remade the old soft bimini, I installed a full length zipper running athwart it so I had, in effect, a convertible. In four years of sailing the Caribbean, I had "the top down" maybe three days. So, there was the answer to the question of whether to go hard-top or not. The hard bimini didn't really cost much more than a new soft one, and it supports solar panels and will not wear out. In addition, all my electrical problems have been solved. For me, it was the right thing to do.
I was surprised to hear that you're letting Memory Rose go, but time marches on. I'm sure the next chapter will be rewarding for you, Ron. And thanks for the info about Songbird's rudder.
Bil Barr
S/V Songbird
Friday, January 20, 2012
CSY 44 Pilothouse (Ketch)

The rare Pilothouse version of the CSY 44 contained everything the company could add to a cruising boat that seemed to be desirable. Some things change, yet some do not. The Pilothouse version is emulated today by many other manufactures and their models have been found for years in nautical magazines.
Photo 1: Was taken off the cover of the 1980 Chart Pack 1980. It shows the Pilothouse charging up to NYC for the Boat Show in the NY Coliseum with a CSY cutter in the backround.
The Company's objectives were clear, as stated in their manual.

 The first CSY Pilothouse CSY was built on the "FLY". Owner of record of hull #1 was, Martin Dean, CFO of the company and also supplier of much of the heavy stainless steel components on the CSY during those years(like the Anchor Platform). He and his wife cruised only locally on the West Coast of Florida, so he wanted a shoal draft version @ 4' 11" (Deep Draft is 6' 6"). To make the N.Y. boat show on time, a team of craftsmen were along for the ride, working on the offshore passage up the East Coast, to finish the interior.
 Yup! IT was finished along the way from Tampa to NYC for the 1978 Boat Show!
Martin Dean later sold the boat in a degraded condition to Bob Jefferies in 1988. But Bob was sharp enough to get Frank Hamlin, early N.A. for CSY on the Pilothouse project, to survey it for him and help him get it home. You see, there were inches of oysters on the bottom-etc..
All went well and the boat, first named Mad Dream for (MD-Martin Dean), was renamed "Whatever", Bob's quick, 'smiling' shot at any bs. was "Whatever..........." :)

Bob Jefferies at the helm motorsailing alongside us in 7 kts. of wind +/-. (1993)
From what I can gather, the Design of the Pilothouses was not a simple matter at CSY. The designing of it was contentious to some degree in the factory. I have NO facts to offer. I do Know, that Peter Schmitt seems to have been the top gun at CSY drawing board, but, resident Naval Architect Frank Hamlin was also listed and seemed to be strongly linked to the Pilothouse project.


The advertisements for all the CSY fleet were frequent but it was clear that the company considered the Pilothouse Ketch as the Queen of their fleet.


For a bit more.... click on link just under this line.
A bit more on Pilothouse CSYs...Will combine these links when I get back to the US
Thursday, January 19, 2012
When CSY closed, Antigua began...and now? Some trivia.
When CSY closed it's doors, the Coats brothers picked up what was left of the company and began Antigua Sailing yachts, using the same molds.
They moved from the Gandy Blvd. location west across Tampa Bay to a building in Clearwater, Fl.
I visited there a few times in the mid 80's and inspected their production.
The Antigua's were lightened by a cored deck and some other cost saving measures. They also marketed a stretched version of the Morgan O.I. 51' ketch but as a sloop.
Well, a few years ago, I ran into one of the brothers down in Guatemala, living on his sailboat.
Now, I see he is back in business, selling.............houseboats!
http://riodulcechisme.com/index.php?option=com_content&task=view&id=1002&Itemid=1
Life moves on. (this 'link' might also have...so do some searching but the story is interesting)
Subscribe to:
Posts (Atom)